
Created by: Paperpansy
When my husband and I were on vacation in Murphy, NC, I found a small scrapbooking shop called Bear Pages Paper Arts. This was the most amazing shop. It had everything I could have ever wanted. The owners were very gracious and showed me a couple of techniques they were teaching in classes the following week. I would have loved to attend, but I was going home. I tried the water color stamping technique. My example is only my second try so I've got lots of practice to do, but I would love to share the technique. It's so much fun!!!

1. Using Coldpress Water Color Paper, 140 lb., first stamp image of flower pot.

2. Next, take a small paint brush, dip it in water and then blot on a paper towel. You don't want it too wet or it will puddle. You only want your brush damp. Using the damp brush pull the color toward the center to create shadows and shading.

3. After your shading is to your liking, add foliage using a combination of stamps or just one. I used long leaves from one stamp set and stems for my flowers from another set. Just mix them up to create the look you are after. Again take a damp paint brush and go over the leaves and stems gently to give them that blurred water color look.

4. Next, add flowers and blend with damp brush.

5. Add centers to flowers and blend with damp brush.
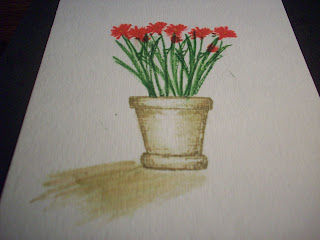
6. Touch damp brush to stamp pad and create shadow.

7. Mat with cardstock and affix to card.
Give it a try. I can't wait to use some life like bird stamps I have. I just need to get a bit more adventurous. I would love to see some of your work using this technique!!! Have fun and play!
1 comment:
Love the card, thanks for sharing!
Post a Comment